Thursday, January 23, 2014

Chunky Floating Shelves - A Tutorial


To start building the shelves you need to measure your space and first figure out how long you would like the finished shelves.  That is what makes DIY projects the best - they can be built to suit your exact needs!  The shelves in our bathroom are 38" long.  I will provide the measurements I used to build these shelves that are a finished size of 38" long by 4" chunky (wide) by ~10" deep.

Materials for 1 shelf:


  • 1 - 4' 1x6
  • 1 - 8' 1x10
  • 1 - 6' 1x3
  • Countersink Drill Bit
  • 2" Flat Head Screws
  • Finish Nails
Tools:
  • Drill 
  • Table Saw (or have the store cut the 1x6 for you)
  • Mitre Saw (or have the store cut the boards for you)
  • Stud Finder
  • Hammer
  • Level

Building the Brace:


The brace is built from the 1x3 board.  First cut the 1x3 to your desired shelf length - this will be your brace body (38" for this tutorial).  Next cut your "legs".  There are 5 legs for our brace (see photo above) each 6 1/2" long.  Screw each of your legs into the 1x3 board you cut to 38" (your body) using a countersink drill bit.


The countersink drill bit will drill a pilot hole into the wood and create a larger hole near the entrance so that the screw head sits inside the board.  If you look at the photo above, you can see the top hole has been drilled and the bottom hole has been drilled and the screw has been attached.  The screw head is sitting into the wood.  This is an important step because this brace needs to sit flat against the wall.  If the screw head is sitting away from the board then the brace will not be stable.

Hint: When attaching the legs to the back brace it is helpful to use 90 degree braces.  It is not necessary, but helpful.

Building the Shell and Attaching to the Wall:


Cut your 1x10 board into two 38" sections.  These will be your top and bottom shell.  Attach one of your cut 1x10 boards to the bottom of your brace with finish nails.  You will nail from the bottom through the 1x10 and into the legs and body of your brace.


Find the studs in the wall where you would like the shelf to hang.  Screw the brace into the studs.  It is helpful to first screw into one stud.  Then level the shelf with a level and screw the shelf into the other studs.


I was able to find three studs behind where the shelf would hang.  I first screwed the shelf into the most center stud and then leveled the shelf and screwed into the two outer studs.  You want to screw straight through the body of the brace and into the wall studs (see below photo).


Attach the top 1x10 board.  Use finish nails to nail the top board in place just as you did the bottom board.


If you have a helper like I usually do, then sit back and watch them for a bit.  It is fun to see what they pick up on from watching you! :-)


The total "chunk" or width of the shelves was almost exactly 4".  Measure your shelves and rip the 1x6 board to that width (or kindly ask the store where you bought the boards to do it for you).  Cut the ripped 1x6 board (now it is exactly 4" wide) to 38" long.  Attach this board to the front of your shelves using finish nails.


If you look closely in the photo above there are finish nail holes in the board that are minute.  They almost go away once you stain and finish the piece.

Below are my two shelves ready to be finished (after of course removing the items on them).  :-)  


To see how the shelves were stained, finished and decorated check out these two posts:

Chunky Floating Shelves and Adding Storage to a Small Bath


and


Saturday, January 18, 2014

DIY Chunky Floating Shelves - Final Photos with Shelf Vignettes


The shelves are done and decorated!  I am in love with them!  I had a hard time photographing them - my lighting wasn't great.  What do you think?


Here they are without any items on them yet:


And here they are loaded up with supplies and "spa-like" items.  :-)  The tall container on the left top shelf contains a candle.  The aged bronze container next to it holds extra toilet paper rolls and then a clock and a photo of Jonathan and I on our wedding day.  On the lower shelf there are extra towels (I wish I could say they were plush, but they aren't...we need new towels) and a small basket containing feminine care items.

Option #1:

Option #2: Instead of the clock, there is a picture hung on the wall and a mirror on the shelf.

Which vignette do you like best?  Option #1 or Option #2?

You can see that they are next to the shower/tub area of the bathroom:


If you continue to scan right in the room, you will see our vanity below on the right.


The only thing we have added to this area of the bathroom (below) are the glass shelves on the wall to the right.  I am not a huge fan of those shelves, but they work for now...

This shot is taken from the doorway into the bathroom (see the door on the right of the photo)
Remaining on this bathroom "To-Do List" is:

1. Frame the mirror above the vanity
2. Replace or find a way to update the light above the mirror
3. Possibly build a different shelving unit between the wall studs where the current glass shelves rest.

Next Post: Tutorial to make your own Chunky Floating Shelves

Before:

After:

Option #2:

Option #1

Close-ups and Detailed Photos:


How have you added storage to your bathroom?  Would you consider making floating shelves?

One more question:  Do you think I should add a third shelf?  I am torn...

Friday, January 17, 2014

Chunky Floating Shelves and Adding Storage to a Small Bath


Our Master Bath is pretty small when you compare it to Master Bathroom's in newly built homes.  A master bath (or "ensuite") wasn't an important component when checking off "must-haves" while house hunting.  If the master bedroom included an ensuite, then we were getting more than what we needed.

So hurray for a master bath!


Our master bathroom was probably the most updated room in the house when we bought it.  It had new tile, a new jacuzzi tub, adequate stock cabinets and new countertops.  I love the tiling job in the bathroom - they did a great job choosing neutral colored tile while adding detailed trim tile.  The photo above shows our toilet sitting next to the tub/shower....pretty bare and in need of some jazzing up!  We really could use more storage in the bathroom and above the toilet looked like the answer.  Who couldn't use more storage in their bathroom?

...Well, maybe these people...

So until the day we have a bath like the one above, we needed another solution...

There were a couple things I knew that I wanted: 

1.  Floating "Spa Like" Shelves - Who doesn't want there bath to look "spa like"?
2.  Custom Built - They would need to be custom built because I wanted them a specific length
3.  Substantial - Not thin pieces of wood that looked flimsy  

I was inspired by these DIY'ers and bloggers:

From Desert Domicile

From Bower Power
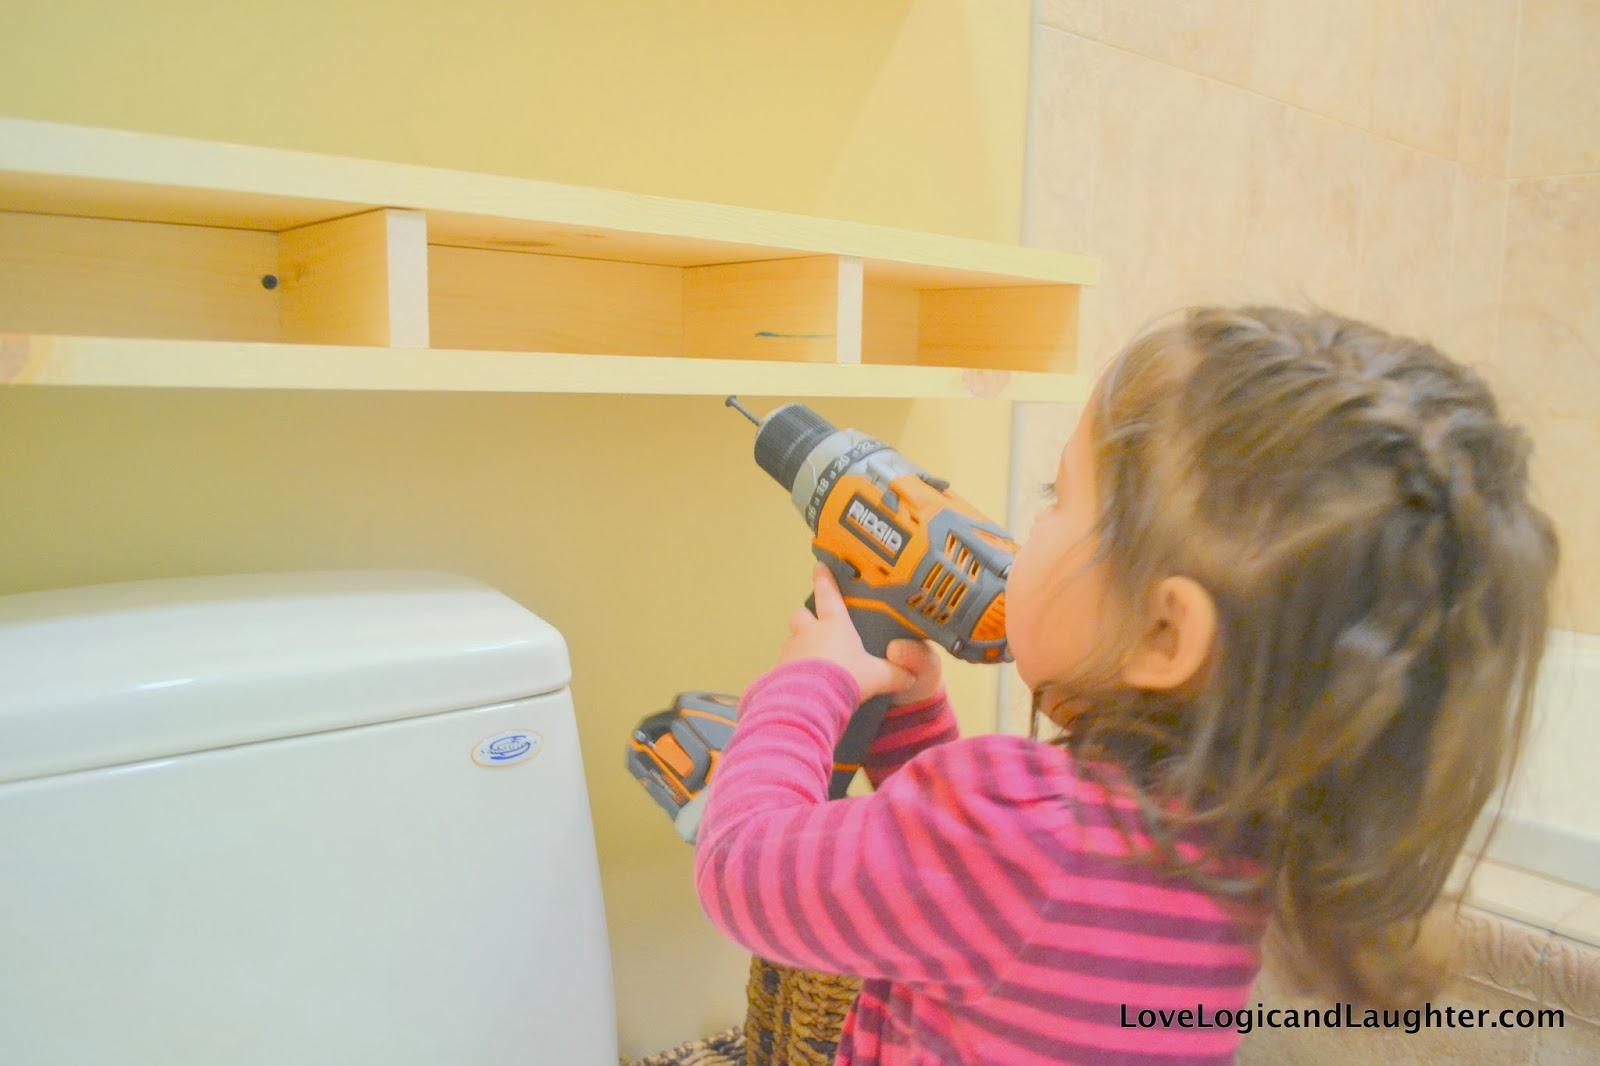
So with the above inspirations and DIY plans in mind I started building.  Actually, I put Eliana to work...       Just kidding, but she almost has the hang of it after watching me project after project.  She put the screw in backwards, but has the general idea of how the drill works.  Good Job Eliana! 


I will post detailed directions on how I built my floating shelves with lumber, cut list and dimensions soon!


I got the skeleton of the shelves onto the wall and was happy with the placement and size so far.  I then added fronts to the shelves (and got to use my new table saw to rip these pieces to the exact size I needed!)  Then added painters tape and started mapping out how to finish these - stain or paint?


 I placed a few items on the shelves to get an idea of how they were going to look finished (and because I was excited with how they were turning out).  I ended up deciding to go with stain - I fell in love with those inspirations photos above so why change it up?


I started with dark walnut stain.  Not dark enough...


So for the next layer of stain I applied Red Mahogany.  Getting there, but you could still see too many knots and grain in the wood for what I wanted...


So then I moved onto PolyShades.  I had recently read an article at Young House Love on how they had used PolyShades on their updated bathroom vanitykitchen cabinets and stairs with success so I decided to give it a try...

Much better!  I used PolyShades in American Chestnut Satin:

The can recommends at least two coats so after a second coat I got exactly what I wanted!


They are currently drying upstairs as I write this post.  I can't wait for them to finish so I can remove the tape and start styling them.  I will post the finished project and a tutorial on building floating chunky shelves soon!

Wednesday, January 15, 2014

Jack and Jill Budget Bath Renovation - Before and After

We face-lifted most of the rooms when we moved into the house.  This bath had a lot of potential but just looked faded and unloved.  We were able to update the bath on a budget by simply applying some paint, a couple new mirrors, lights and countertop.  Everything else we were able to re-use or re-purpose.

Before:


We started by removing the wallpaper.  This was task #1 for most rooms in the house.  Once that was done we painted the walls and the cabinets.
 One benefit of the cabinets being in such poor cosmetic condition is that it didn't take a lot of sanding or prep work prior to being able to paint the first layer of primer.  We used both spray primer and spray paint to paint the cabinets so that we could get an almost flawless "airbrushed" finish.  Someday, I would love a paint sprayer (hint hint Jonathan ;-) By reusing the cabinetry already in the bathroom we saved several hundreds of dollars  (maybe even a couple thousand dollars)- custom cabinetry is very expensive and because this is an older house we would of had to order a custom cabinet to fit this space.

After:

After:

Before:

We removed these lights and the mirror and replaced them with new updated versions. Two smaller mirrors were placed above each sink bowl with the lights centered above the mirrors.  Because this room doesn't have a window (it is between two bedrooms - hence "jack and jill bath") it was pretty dark without any natural light.  So when replacing the lights we purposefully looked for fixtures that would give off more light than what we previously took down.

After:

Before:

We replaced the sink bowls and and countertops, but we were able to re-use the faucets.  We chose a granite that coordinated with the toilet and tub.  They are a creamy color and this granite has a creamy undertone.  I was nervous the day they were delivering the granite because I was afraid it may clash.  I thought it might look like we were trying to match it and failed...but fortunately it looks better than I had dreamed the best case scenario could be.

After:

Being able to re-use the faucets saved us a couple hundred dollars!  With a little deep cleaning they became bright shiny and almost new again!
After:

We also updated some of the hardware on the cabinets.  I found these blue knobs at Anthropologie on clearance.  I was happy with the way they semi-coordinated with the hinges that were already on the cabinet doors.  This way we were able to re-use the hinges and just buy new knobs.


We didn't do anything with the tub or toilet - we kept them as they were other than adding some artwork above the toilet and a new shower curtain for the tub.  The artwork was a gift from my sister Nicola - I think she found it at a small boutique in Chicago.  I love the playfulness they bring to this children's bathroom.  The shower curtain was from Target.


New tubs are very expensive.  A lot of the expense can be in the labor, but the material is also pricey.  We don't mind the color of the tub/toilet and with the new granite we think they almost look like we chose them to be this color when we redid the bathroom.


There is one overhead light in the bathroom as well as a vent.  We decided to keep them and re-purpose/update them by spray painting the base of the light and the cover of the vent.  We ended up buying a new glass shell for the light (for just a couple dollars).  The previous shell had been white.  This one is clear and allows more light to shine through it giving us even more light in this no window bathroom.


Light fixtures are easy to paint!  You can update almost any fixture for about the price of one can of spray paint.  To see more on spray painting light fixtures check out this post: Painted Light Fixtures/Chandeliers.