Labels
Showing posts with label Tips&Tricks. Show all posts
Sunday, February 9, 2014
Did You Know That Leeks Float!? {Super Easy Way To Clean Leeks}
I love using leeks. I think they are a great alternative to onions. Don't get me wrong...I love onions too - especially when caramelized - but leeks add a refreshingly new flavor to a food or recipe. Anyway... I love leeks, but I don't love cleaning them... they can be gritty if not cleaned really well.
Recently I came across a recipe in Smitten Kitchen and she recommended dumping them in water after cutting to clean them. I figured I would give it a try and was so excited when I let them go into the tub of water and they floated back up to the top! Woo-hoo! The grit sunk to the bottom and the the leeks rose to the top!
Did anyone else know this special trick? If you did, then why didn't you share it with me!?!? Any other special tricks I should know? I felt almost foolish as I dunked them in the water thinking I would have to fish them back up from the bottom. As they came to the top I am sure a beaming smile spread on my face. It was such a pleasant surprise!
So next time you have a recipe that calls for leeks cut them and then dunk them up and down in a big bowl of water as you pull the layers apart. The sand and dirt will fall to the bottom and the leeks will float on the top.
Monday, February 3, 2014
Using Stair Tread Nosing as Finishing Trim on Built-in Shelves
I was so excited about the "DIY - Between the Studs Storage" until it was finished and I didn't love the end product... there was something missing in the trimwork. I couldn't decide on wood trim, wood accents, white trim or painted trim to match the room...
While perusing through the trim isle at Lowe's for inspiration, I came across stair treads. I decided to give them a try. The wood boards from the above photo came off and the stair treads were stained and put on as seen in the photos below.
BEFORE STAIR TREAD NOSING ADDED:
AFTER STAIR TREAD NOSING ATTACHED:
It coordinates well with the sink base cabinet below without becoming an overpowering brown hole in the wall. I like it now... I still don't LOVE it...
The stair treads were purchased at Lowe's for about $6/piece:
I finished them the same I way I finished our Chunky Floating Shelves:
I stained them with Red Mahogany Rust-Oleum stain in satin first. And then I put a layer of PolyShades over them to darken them a bit more and tone down the wood grain a bit while also polyurethaning them.
For a tutorial on how to make this wall unit yourself check out: Between the Studs Storage - A Tutorial
Wednesday, November 13, 2013
"Homemaker's Stainless Steel Cooktop Cleaner Friend"
We recently got a stainless double oven:
I love it! With the exception of the stainless top...it is so hard to clean! Oil and grease get caked onto it so easily...
I tried several products:
None of them worked very well...
Then I tried Bar Keeper's Friend....and it is really my new friend. It could be renamed to:
"Homemaker's Stainless Steel Cooktop Cleaner Friend"!
So then I made a paste by mixing just a couple drops of water into the formula and stirring it with an old toothbrush:
I rubbed the paste around all the burners and waited about 5 minutes...
And Wallah!!!!!
YES! A new clean cooktop! Almost like new again thanks to Bar Keeper's Friend!!!
Saturday, January 5, 2013
Painted Chandeliers / Light Fixtures
| After |
| Before |
| After |
| Before |
BEFORE and AFTER
Painted Light Fixtures
When we moved into our home we did a major makeover on it. Of course the work is never done, but we have gotten to a point where we live comfortably in it without feeling like it isn't ours.
Almost every light fixture in the house was replaced - a very easy diy if you know basics of electrical work (thanks for teaching me Daddy). So we saved money by replacing the lights ourselves, but it also gets expensive buying new lights.
When looking for lights in the kitchen I knew I wanted an oil rubbed bronze color with some crystals. We needed two flush mounts, one hanging chandelier and one small hanging chandelier for above the sink. I found lights that I liked and that were in our budget, however they weren't all oil rubbed bronze. The two flush mounts were chrome... darn.
Fortunately that is an easy fix. You can easily paint a light fixture. Take the crystals off, cover the electrical part of the light (I usually use electrical tape) and lightly brush the metal with extra fine steel wool to rough it up just a bit. Then pick a spray paint color and paint. Whala! Easy! Done! Now we have four coordinating light fixtures in the kitchen.
| Painted oil rubbed bronze |
| A lot of the pieces are removable. Take the fixture apart to paint it more easily. |
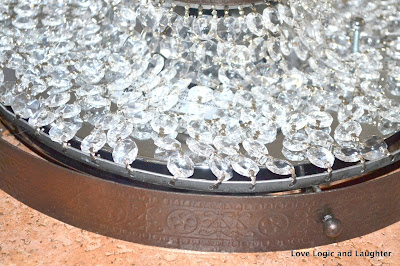
| side picture of the painted fixture |
Finished and Hung:
| You can see the two flush mounts are painted and the chandelier (hanging over the table) matches nicely. They also match the mini chandelier hanging over the sink. |
For example, here are the lights in the downstairs powder room:
Here is the before:
YIKES!
Yes, we did buy this house... but you can see we changed it quite a bit. :-) Obviously, the light fixtures weren't the only problem in this bathroom. But it is the only "Before" picture I have. You can see they are the same fixtures, just painted oil rubbed bronze. Tada!
And just for fun, here is a picture of one of the "before" kitchen light fixtures - it couldn't be fixed with just paint...
| Wow - there it is on the right... |
To see Before and After Photos of our kitchen check out: Budget Kitchen Makeover
| Our kitchen looks totally different now - thank goodness! Still not sure how I convinced my husband this house had potential - looking back at the pictures I don't know how I saw it either... |
![]() |
| And most importantly, HAPPY BIRTHDAY MOMMY! WE LOVE YOU!!! |
Subscribe to:
Posts (Atom)


