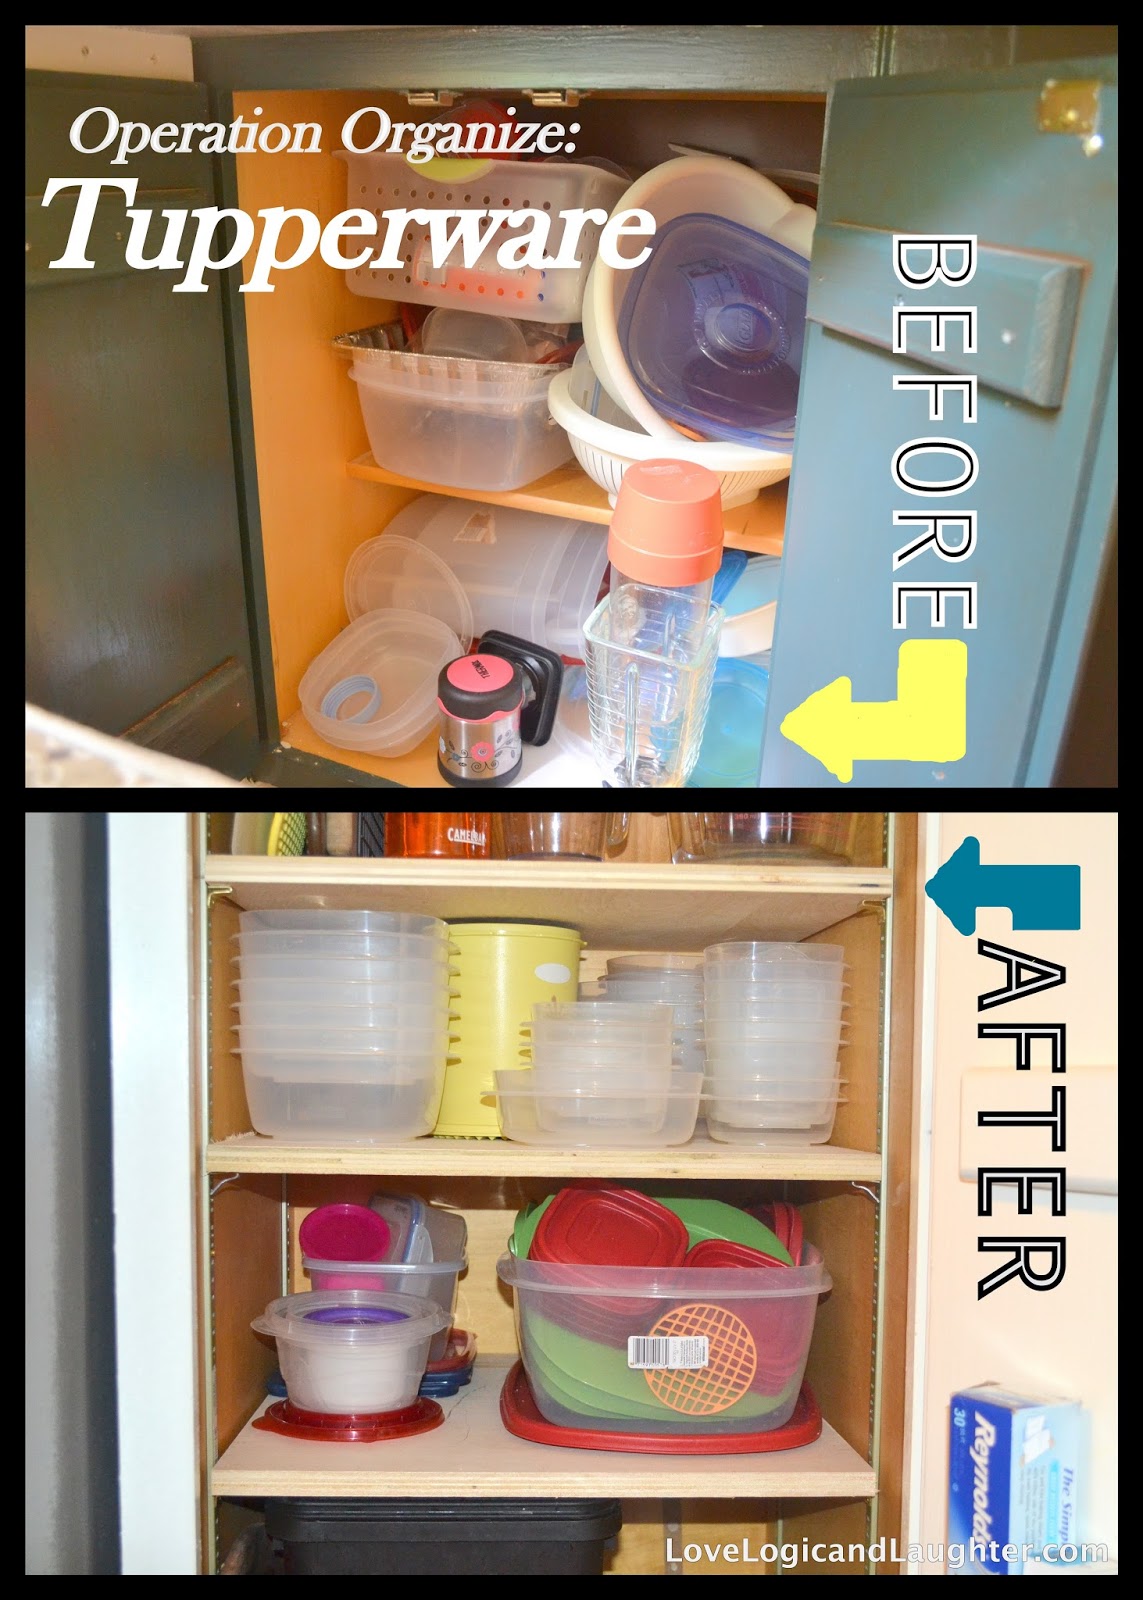
Wednesday, August 28, 2013

Operation Organize - Tupperware


Before:

After:

It is amazing what improved accessibility and a few labels and organization can do to your spirits!

Our tupperware was previously stored here:

In that cabinet stuck in the corner - we always fought with it!

The Solution

Accessible: 

The first solution was to move the tupperware to a more accessible location - that way it will stay organized! This cabinet (below) is located directly to the right of the fridge.  Most tupperware goes into the fridge anyway - so perfect new location!


Organize:

Next, all the tupperware was sorted.  A lot was thrown away - we had several containers that looked like they had been to war so they were discarded.  Others were thrown away because they were either missing a lid or they were not really tupperware (containers we had kept from store bought food).  All the others were organized and stacked by size .  The lids were all thrown into a large tupperware container.


Label:

Finally, the shelves were labeled.  When labeled no one has an excuse to not know where something goes.  So I labeled all the shelves as follows: Top Shelf - Cast Iron and Clay Bakers; Second Shelf - Cutting & Cooking Boards on Left, Mixing & Measuring Bowls on the Right; Third Shelf - Tupperware Containers; Fourth Shelf - Odd Tupperware on Left, Tupperware Lids on Right; Bottom Shelf - Recycling on Left and Baggies on Right.


Before:


Monday, August 26, 2013

"Be Passionately Curious" - Free Printable


I decided my basement entry needed some inspiration!  

After scouring online for something fun and not finding anything that I absolutely loved, I decided to try and make my own.   So, here is my free printable!  It is inspired by Albert Einstein's quote: "I have no special talent, I am only passionately curious".


It is lime green and blue - bright colors I chose for the basement entry because it is so dark and dreary down there otherwise...


To download, click on this link.  Once the webpage opens, click on "download file" to download and save it to your computer.  It should print out for use with an 8x10 mat or frame.  Remember to change your document settings to print in landscape.  Good Luck!


Thursday, August 15, 2013

DIY Upholstered Ottoman from an Old Coffee Table - A Tutorial


Materials:
  • An old coffee table (Craigslist or hand me down)
  • 2" Foam
  • Batting (thicker is better)
  • Staple gun
  • 1/2" plywood cut to size (Home Depot or Lowes can make your cuts for free)
  • Spray Glue
  • Fabric
  • Sander
  • Primer
  • Paint
Most upholstered coffee tables wrap the foam/batting/fabric around the entire top of the coffee table and staple the fabric to the underside of the table. See picture below:

I was inspired by this post at No So Newlywed McGees
I wanted to maintain the rounded/scalloped edges and details of my coffee table so I decided to do my project a little differently. I upholstered a 1/2" plywood board and then attached this board to the top of my coffee table.


  • Cut your plywood board just smaller than your coffee table top


  • Cut your foam: you want it to be about 3/4" longer and wider than your plywood board

Use a serrated knife to cut your foam(I used a bread knife and it worked great)


My coffee table is pretty wide so I needed two pieces of foam:


  • Cut your batting: You want this to be 2" longer and wider than your foam
(You cut these items longer than the board so that when you upholster it
they wrap around the edge of the board - it will make a more rounded/plush edge)


  • Cut your fabric: You want your fabric to be several inches longer and wider so that it can wrap around all the other materials and onto the back/underside of the table to be stapled.

You can see how the pieces are layered in the picture above. 
From bottom to top: coffee table, plywood, foam, batting, fabric
  • Layer your pieces: Between each layer (plywood and foam, foam and batting) use spray glue so that the layers do not shift:


  • Fabric and Staple: Pull your fabric tight around all your layers (plywood, foam, batting) and staple it on the back of your plywood board.


You will probably want to trim the extra batting from the corners. Otherwise your corners won't fold cleanly. Staple the sides first and then the corners. See my previous post: Recovered Foot Stool for details on how to staple sides and corners when recovering/reupholstering.


The upholstered top is just resting on top of the coffee table - still need to paint the base and then attach the top to the base.

You have an upholstered top!

Now to finish the bottom:


  • Start with your coffee table


  • Sand it well! You want to remove all the shine from the surface so that your paint will stick. I used a palm orbital sander and 120 grit sandpaper - I didn't take a picture of this, but you want to sand it well.  You will be upset with yourself later if you did not sand well and the paint chips off.


  • Prime your table. I used 1-2-3 Bullseye water based spray paint primer


  • Wait for your table to dry!


  • Paint your table - I used an ivory colored spray paint. It took three coats to get a nice even coverage


To see more finished pictures check out the finished product here: DIY Upholstered Ottoman  

Next post: How to attach your upholstered top to your newly painted coffee table base

Tuesday, August 13, 2013

DIY Upholstered Ottoman


I am so excited about this project that I have to post a few pictures now.  I will post a full tutorial later because I took several pictures along the way, but for now here are just some Before and lots of After shots!


My mother-in law was getting rid of this coffee table.  It is solid wood and originally from Ethan Allen so I knew it was a quality piece of furniture.  It just needed a little makeover for our house!


I have been wanting to make an upholstered ottoman from a coffee table for a long time.  I have been inspired by others and have several of these inspirations pinned on my pinterest page.


Next project in this guest bedroom: Paint the walls!
I am thinking a soothing sage green...but will take suggestions from anyone! :-)