Thursday, January 31, 2013

A Parent and A Therapist - Coloring and Crayons


When you are a Mom you are always wondering if you are making the right decisions. Knowing your parenting choices will impact your child, you wonder if it was the right choice or the wrong one. Of course children are resilient, and particularly in the first few years, they allow you to learn and grow as a parent too.  So will one small wrong parenting choice hurt your child forever?  Most likely, No.  So it is funny to think that I even agonized for a millisecond about the crayons I gave Eliana to play with today.

As a pediatric Occupational Therapist, I had the benefit of working with children prior to becoming a Mom.  I think there were several benefits to this - for example, I am familiar with child development.  The problem is that sometimes I can be too aware of how children develop.  I tend to analyze every toy to make sure there is some type of benefit.  I ask myself, "Is this toy helping her fine motor, visual motor, sensory motor development?"  I sometimes have to remind myself that playing just to play has its benefits as well.

For example, today we were coloring.  I looked at the crayons I had given her to use and realized I had given her crayons that were "too advanced".  Then almost immediately I thought "Danielle, you can't really give a child crayons that are too advanced".  The Mom in me picked the crayons that were most convenient at the time.

I had given her crayons very similar to these:

The reason I first thought "why did you give her the double sided crayons?" is because the therapist in me would use these particular crayons with an older child to work on a skill called "in hand manipulation", more specifically "Complex Rotation".  This is the ability to rotate an object in the pads of the fingers without the assist from the other hand or another object (body, table, ect).  To visualize this skill think about wring with a pencil and deciding to erase the last word you wrote.  You need to flip the pencil from the pointed end to the eraser end - that is complex rotation.

So does it hurt for Eliana to play with these "too advanced" crayons?  Of course not!  But is she getting all the benefits the crayons have to offer? No.  Actually she ended up breaking two of the crayons.  These crayons look fancy and fun in the store so they are a little more expensive.  At this point in her development all Eliana really needs are fat regular crayons.  Developmentally she doesn't have the fine motor skills to color with anything more than a "gross grasping pattern" (fisted palm around the crayons with pinky side toward the paper).  At most, she will use a "palmar grasping pattern"(fisted with thumb toward the paper).

So when you go to the store and see the vast displays of coloring apparatuses don't be overwhelmed and or think you need to buy the most expensive flashiest crayons.  When first starting to color thick (fat/chunky) regular crayons are great.


These "chunky crayons" above are great for first timers!


For the next stage of developmental coloring you don't even have to buy new crayons!  I will post on how to make your own developmentally appropriate crayons for the next stage - it is super easy - I promise!

I think this is how two of the crayons were broken... :-)

More on "container play" later.  Why the therapist in me puts toys inside baggies and other containers :-)

Tuesday, January 29, 2013

Spice Dutch Baby

Recently, My Favorite Breakfast!


I have made this recipe three times since Thursday (it is now Tuesday)...so  three times in less than a week.


It is out of Deb Perelman's cookbook The Smitten Kitchen Cookbook.  She is the owner/author of one of my favorite cooking blogs, Smitten Kitchen.  It is an absolutely fabulous cookbook - I have only had it a week and have made three different recipes from it (and we were out of town for half of the week).

I altered it just slightly by substituting honey for molasses and adding a tad more cinnamon.  We were out of molasses when I had the urge to make it.  I love it so much with the honey - I don't know how it could get much better, but Deb is almost never wrong, so I say give it a try both ways.


Spice Dutch Baby:

(altered slightly from Deb Perelman's Gingerbread Spice Dutch Baby)

2 large eggs
1 T dark brown sugar
1 t honey
1/3 cup flour
1/3 cup milk
1/2 t ground cinnamon
1/8 t ground ginger
pinch of ground cloves
1/8 t freshly grated nutmeg
1/4 t kosher salt
2 T unsalted butter
Powdered Sugar and fresh fruit to serve

Preheat oven to 400 degrees.  Run the eggs in a mini food processor until smooth and pale in color (about the color of buttermilk).  Add remaining ingredients except butter and powdered sugar.  Process until smooth.  Melt butter over high heat in a 9 inch ovenproof skillet (cast iron works well).   Swirl the butter up onto the edges of the skillet as well (because it is going to puff up a bit).  Pour the batter into the prepared skillet and bake in oven for 15 to 20 minutes.  Slide the dutch baby onto a plate and serve with powdered sugar and fresh fruit.  I like to put my powdered sugar into a wire colander and shake a bit to get the dutch baby lightly coated in powdered sugar.  I serve fresh fruit (usually blackberries and/or blueberries and raspberries) on the side.  Eliana approved!

Best of all, it takes no time to make!  Less than ten minutes to prepare - by the time your oven is preheated you can stick it in to bake!  Mine is preheating now :-)


It is also fun to make these in small miniature versions using a muffin tin to cook them in:


Especially for toddlers who like things prepared in miniature versions:


Another great Smitten Kitchen breakfast recipe: Raspberry Breakfast Bars
They are almost like homemade Nutri-Grain Bars, but sooooo much better!  I have made them with blueberries and blackberries as well - all are equally good, but raspberries are my favorite!


Wednesday, January 23, 2013

Couch Makeover


Have you seen the magazines that tell you that you can update your couch in minutes by changing out the pillows?

BEFORE

AFTER


Well, I decided to give it a try!

AFTER

I am happy with the results.  I think it brightens the room.


I took it to the extreme and rather than changing out decorative pillows, I just took the big back pillows off and replaced with multiple fun colorful pillows.


I also added coordinating pillows to the chairs in the room.


I think it helps to bring the whole room together.

This picture makes me realize how much I want new drapes (these came with the house - we at least removed the lace that came with them...)


 Wallah!  An almost New Couch!


Friday, January 18, 2013

diy Chunky Candlesticks - Part 1

I decided when decorating for Christmas this year that I needed more candlesticks.  I love my large chunky wooden candlesticks, but when I looked at Pottery Barn this is what I found:


Beautiful, but I wasn't willing to pay $50 - $90 for one candlestick.  I had found my other candlesticks at T.J. Maxx years ago so I knew it would only be luck if I could find them at a like store again.

So....I am going to try and make my own.  I am not sure how these are going to turn out, but I figured I would give it a try.

This could be bad... or it could be very good... but I will never know unless I try.

I headed to Lowe's (or maybe it was Home Depot?) and found these turned table legs.


So I picked up two of the shorter legs (6")


And one of the longer legs (14")


And then I proceeded to go home and look through our HUGE leftover wood pile in the basement where I thought I could get creative for the bases and tops.

This is a little embarrassing - it is a mess!

Maybe this is the motivation I need to keep the basement more organized - my new year's resolution!
I found some scraps of wood and used my miter saw to cut them to squares, rectangles and even an octagon (I figured I would play a bit and see what shape I could make :-)


I played with the shapes and came up with this arrangement.

The candlestick on the right is drying - hence the weight on top

The candlestick on the left is composed of the two smaller legs and the candlestick on the right is composed of the larger leg.  Both have mix/match bases and tops from our wood pile.

I drilled into the pieces and used wood glue to combine them.


So we will see how they turn out, but here are the candlesticks prior to sanding and stain or paint (I haven't decided which).


Wednesday, January 16, 2013

Recovering Foot Stool

A 30 minute DIY: Recovering a Foot Stool


This was my warm up project for reupholstering two tufted ottomans. I am still working on the ottomans, but will post them later.

Tools needed:

Staple Gun

Fabric

Screwdriver


Here is a picture of the foot stool prior to changing the fabric.


It wasn't bad at all, but wasn't my style and didn't quite go with the decor.


Here is an after picture of the foot stool.


Changing the fabric on a foot stool like this is the same as if you were to change the fabric on a kitchen or dining room chair.


You first take out the screws from the bottom that are holding the seat pad onto the frame.


You then can either take the old fabric off and use it as a guideline/pattern for the new amount of fabric you will need or you can leave it on like I did and just place the seat pad upside down on your fabric and cut what you need by adding 5-6 inches of fabric from each edge of the pad.

I laid the seat pad upside down on the wrong side of the fabric and cut out what I needed of the new fabric by adding a few inches on all sides.
After cutting you fabric, turn it so that the wrong side is facing up. Place your seat pad right side down on the fabric and pull the fabric up around the sides so it is taught. Use a staple gun to staple the fabric to the underside of the seat. I started with one staple on one of the long sides.  I then pulled the fabric taught and stapled one more staple on the other long side (the opposite side). Place one to two staples per side and then go back and add more staples each side.


You should have all four sides stapled before attempted to staple the edges/corners.

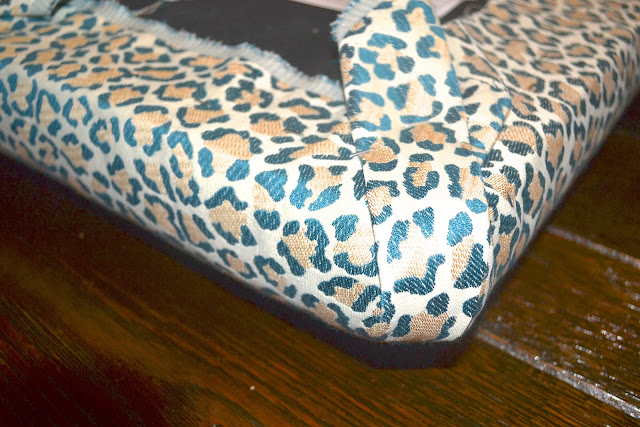
When folding the corners try to crease them and fold them up so they look neat - see pictures below:


You can see that first I stapled the sides and then stapled the corners in the picture below.


Then screw the seat back onto the frame.


It is an easily portable foot stool that can be used to rest your feet or can be pulled up next to the fireplace to sit on to enjoy the fire.


I love the bright blue animal print - much more our style than the stuffy black and beige velour like fabric.